Pages

Showing posts with label HowTo. Show all posts

Thursday, July 19, 2012

Multigrain-Lentils-Nuts "Health-Mix" Powder + Oatmeal- HealthMix Porridge

This is MIL's signature Health-Mix Powder recipe that she makes with so much love and care for her dear dear grandson. This powder is really something! You will see when you scroll down to look at the ingredient list. I have been feeding this "fortified porridge" since when my son Aran was 18 months old. I call this a "wonder powder". Sometimes I make this porridge for myself too. It is simply too good to resist!

Making this powder is truly a tedious process and is not something that I would even attempt to make it here simply because I wouldn't know where to find a "Flour Milling plant" and I am not buying the mini flour mill..Not yet atleast. In India though, every town has atleast one such plant. Every plant/factory has different Flour Mills for grinding Chili, Coriander, Grains, mixed-grains etc etc. The ingredients after going through the meticulous process of cleaning,drying,roasting gets mixed and is finally taken to the plant where it comes out as a finely milled product.

Note: Before feeding this powder to my son, I fed every ingredient separately and methodically for about a week or so to conclude that my son wasn't allergic to any ingredients that went into making the powder.Please do the same if planning on feeding this to young ones.
Ingredients:(Large Scale Prep, Yields ~4-5lbs of HealthMix Powder)
For the Health-Mix Powder:
  • 2.2 lbs/1 Kg Finger Miller/Ragi
  • 1/4 Cup Pearl Millet
  • 1/4 Cup Sambha Wheat(Wiki: Better than Ordinary wheat with low GI)
  • 1/3 Cup Each (Parboiled Rice,Red Rice,Barley,Roasted Split-Chickpea "Pottu Kadalai/Buna Channa",Dried Corn Kernels,Whole Green Gram, Sago,Dried Garbanzo Bean/ChickPea)
  • 1/2 Cup Cashew
  • 2-1/2 Cups Almonds (Not the blanched ones)
  • 3-4 Tbsp Cardamom (With Pods)
  • 2 Tbsp Dry Ginger
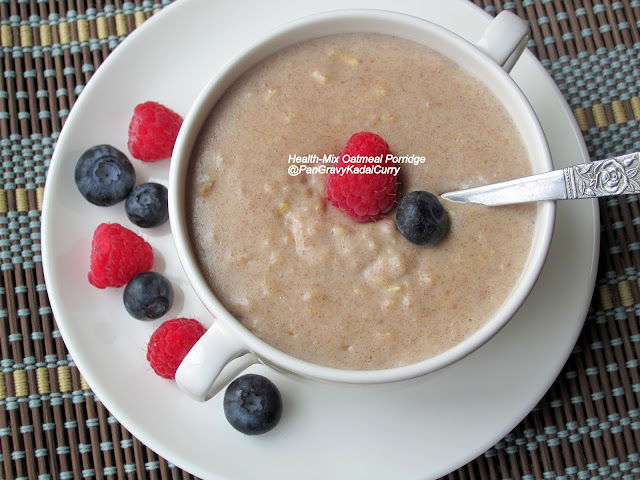
For the Porridge: (Yields 1 Serving for a 4-yr old)
  • 1/4 Cup Old-Fashioned Oats
  • 1-1/2 to 2 Tbsp Health-Mix Powder
  • 1 Tbsp Brown Sugar, packed
  • 2 to 2-1/2 Cups Whole Milk + 1/2 Cup more
Procedure:
  • To Make the Health-Mix Powder: Wash the Finger Millet, Pearl Millet and Sambha Wheat. Dry it completely in the Sun. Dry roast it until it emits aroma. Set aside. Roast everything else in a large kadai until they emit aroma. Don't overdo this step, especially watch out for the Corn Kernels that might start popping. Dry Roasting ensures that there is no moisture and increases the shelf life of this powder. Mix the whole thing in a container and take it to the flour mill to make it into a "finely milled powder".
  • Divide the HealthMix powder into small portions in a thick plastic bag and freeze them for upto a year. I keep a small portion of this in the refrigerator and the rest sits in the freezer.
  •  To Make the Porridge: Add all the dry ingredients for the porridge into a sauce pan.
  •  Pour the milk and mix with a whisk. Bring the mixture to a boil while constantly stirring. This step is important because they start clumping together and stick to the bottom of the pan. Once they attain a goopy consistency, switch off the stove.
  •  More (cold) milk may be added if the mixture starts thickening. Top it with fruits of choice or not.

Enjoy! 
Check out the Blogging Marathon page for the other Blogging Marathoners doing BM#18
Read More...

Wednesday, July 18, 2012

Homemade Ginger-Garlic Paste

Ginger-Garlic paste, like Masala powder is a must in Indian cooking. I cannot imagine a dish without ginger and garlic, be it vegetarian or non-vegetarian. Having the paste handy will save you time on peeling, chopping and mincing. I don't bother much making this at home as I don't mind using the readymade ones from stores.They are equally good.

Common Concern about the greenish hue the "Homemade Ginger-Garlic Paste" develops over time: I did a Google search and found this here:
1. If fresh garlic is picked before it is fully mature and hasn't been properly dried, it can turn and iridescent blue or green color when in the presence of an acid- in this case, the oils of the ginger.

2. A reaction between garlic's natural sulfur content and any copper in your water supply, or in the cooking utensils your are using (such as cast iron, tin, or aluminum) can sometimes change the color of garlic.

3. Garlic will also turn green (develop chlorophyll) if exposed to an temperature change or is exposed to sunlight. Some people say it can be stored for 32 days at or above 70 - 80° F to prevent greening.

4. Are you using table salt instead of kosher or canning salt? That can cause the garlic to turn blue or green. Table salt contains iodine, which discolors whatever you're pickling/preserving. Use kosher or pickling salt.

Don't worry, greenish-blue color changes aren't harmful and your garlic is still safe to eat. (unless you see other signs of spoilage- mold, odor).
Ginger/Garlic paste can be frozen in small portions and  thawed right before using it.

Ingredients (Yields ~14 Oz/ 1-3/4 Cups):
  • 4 head Garlic
  • Palm-sized Ginger
  • 2 Tbsp Olive Oil
  • 1 Tbsp White wine vinegar
  • 1 (Heaped)Tsp Salt, Kosher or Pickling Salt ideal
Procedure:
  • Peel the Garlic. Wash and Peel Ginger. It doesn't have to be perfectly peeled. Pat it with paper towel to remove all traces of water. It doesn't have to be perfectly peeled.
  • Roughly chop the ginger and add both the ginger and garlic to the blender. Add the oil, vinegar and salt. The Oil, Vinegar and Salt act as preservatives.
  • Blend it to a smooth paste.Make sure the blender jar is dry. 
  • Scoop it from the blender using a dry spoon and fill a dry air-tight container. Store it in the coldest part of the fridge. Never keep it at room temperature.Shelf life is upto 6-8 weeks. Freeze to extend the shelf life. Always use dry spoon to retrieve the paste.
Some Recipes using Ginger-Garlic paste:
Baked Tandoori Chicken:


Healthy Kadai Paneer:

Crispy Baked "Masala" Chicken:
Enjoy!
Check out the Blogging Marathon page for the other Blogging Marathoners doing BM#18
Read More...

Tuesday, July 17, 2012

Basic Roti Dough + Roti Making

 Ingredients:
  • 3 to 3-1/2 Heaped Scoops All-Wheat (No-Maida) Atta Flour (I used Aashirvaad Brand)
  • 3 Tbsp Low-fat Buttermilk
  • 1 Tsp Olive Oil
  • 1-1/4 to 1-1/2 Cups Warm Water
  • 1/4 Tsp Salt
Procedure:
  • Add the Atta Flour to the Food Processor. 
  • Pour the buttermilk, oil and add salt. Close the lid and run the processor at medium speed. Sice buttermilk has lactic acid, it helps to soften the dough.
  • As the food processor runs, pour the warm water through the spout/mouth at the top in a steady stream. After 1-1/4 cups add it in small amounts. The dough will start forming into "granules" and then start clumping together. This is an indication to stop adding water. Switch off the processor.
  • Test the dough consistency with fingers. If the dough is firm and pliable then collect the clumps and add it to a pan.
  • Knead until it forms a smooth pliable dough. If planning on making Roti within the next hour or so do this: Sprinkle about 1/4 Tsp water on the top of the dough and on the sides of the pan. Lid the pan and let the dough rest for an hour. If planning on making Roti the following day or 2 do this:Smear little oil and cling- wrap the dough and refrigerate. When ready to roll-out, bring it to room temperature by nuking in the microwave for NOT MORE THAN 15 seconds. More than that will cook the dough.
  •  Divide the dough into meyer-lemon sized/golf-ball sized balls.  
  • Roll them between the palm of your hand to a smooth ball and flatten them to discs.
  • Dredge them with "Atta flour".
  • Roll them to "evenly-thick" discs of 1/10" thick. That is the optimal thickness of the Roti.
  • Repeat the above 2 steps for the remaining discs.
  • Heat a cast-iron griddle or tava. Once it is hot(test it by sprinkling some water..if it sizzles then it is hot enough), reduce the flame to medium, spray oil from a mister and smear it evenly with a paper towel. Add the Roti and fry for about  minute or until you see several brown spots on one side. Flip and repeat. You may spray some oil if you wish.
  • Pressing it gently with an offset spatula to aid "puffing-up".
  • If the dough was rolled out evenly and the heat was the right amount then the Roti will puff up. Do not overcook the Roti. The longer it is on the griddle, the harder it will turnout. After making the roti let it cool for a minute and then layer up one on top of another in a hot-pack so it keeps warm until it is ready to be consumed. They are best when eaten warm with lentil-based curries or chicken/lamb curries/kurma.

If you want to take this one step ahead, you may try the Lachedar Paratha, which is a bit time-consuming to mak, with layers and all  but totally worth it!

Enjoy! 
Check out the Blogging Marathon page for the other Blogging Marathoners doing BM#18
Read More...

Wednesday, May 16, 2012

Basic "White" Chicken Stock

This is how I have been making Basic "White" Chicken Stock at home. I usually make large batches and freeze them in small portions as I am constantly making Pot Pie(family favorite), Pulled Chicken Noodle soup or Meatball Soup...especially during the winter season when someone or the other in the family is having the sniffles.During such occasions, a good nourishing soup and rasam(South Indian Pepper juice) are a must.

Recently I tried Chicken Soup with exotic Amaranth Leaves plus a few vegetables for my friend who recently gave birth to an adorable baby girl. She said it was awesome - just what a lactating mom needs.  So am planning to give it another spin in the kitchen this weekend. Keeping my fingers crossed that I find some Amaranth Leaves in the store.

Basic Homemade Chicken Stock(For 8-9 cups):

Ingredients: 
  • 4 Chicken Thighs and a few chicken parts 
  • 2 Stalks Celery, halved and quartered ( I freeze the rest)
  • 2 Carrots, peeled and cut into sticks
  • 2 Small Yukon Gold Potatoes, cleaned and halved
  • 1 Small Red Potato, cleaned and halved
  • 2 Red Onions, peeled and halved
  • 2 Garlic Cloves
  • 1 Tsp Black Peppercorns
  • 3 Bay Leaf
  • 3 Cloves
  • 4-5 Stalks Parsley or Cilantro
  • 1/2 Tsp Dried Thyme,optional
  • 10-12 Cups Cold Water 
Procedure:
  • Place the cut celery sticks, carrot sticks, halved potatoes, halved onions, garlic cloves, cloves, bay leaf in a big stock pot.
    • Clean the Cilantro or Parsley and Thyme. Place it in the pot.
    • Wash the Chicken thighs and parts(if using) thoroughly in water. Place them in the pot and add 12 Cups cold water.
    • Place a dome lid/lid on the pot and let the ingredients simmer at a medium flame for 45 minutes to an hour.
    • Midway during this process, open and stir the contents. The mixture should look frothy like in the picture. The smell is phenomenal too.
    • After an hour, drain the contents into a colander.
    • Once cooled, divide and add the stock into smaller storage containers and freeze for future use. The stock will stay good for 3-4 days in the fridge.
    • Nothing beats home-made stock.

    Recipes that I have created with this Chicken Stock-


    Enjoy!
    Read More...

    Saturday, January 14, 2012

    How to Skin/Peel Almonds

    This is a prelude to something "really sweet". Yeah, a decadent recipe with photo-laden post is coming your way. I wanted to add this to that "mystery post" but because that post already has 20+ pictures it didn't seem wise to overload that post. So here is a super quick tip on peeling almonds -- its easy and breezy!
    Ingredient:
    • 1-1/2 Cups Almond
    Procedure:
    • Add the almonds to a wide shallow pan.
    • Pour hot water to cover up the almonds. Lid the pan and let it sit for 8-10 minutes.
    • Nip the tip(at the small end) of the almond and press the almond between your thumb and forefinger. The nut slips outs from the skin.Was it with cold water and wipe it clean with paper towel.
    • There you have it --  peeled almonds!
    Enjoy!
    Read More...

    Friday, December 30, 2011

    How to Pack Lunch For Kids

    BM#11I was intending to post something else for today but that experiment went awry. Oh, Bummer!! Ergo, I didn't want to post something that didn't end up right. This was the backup post that I have been intending to post sometime next year! But you all get to see it this year itself! Sweet, no??

    I find packing lunch  for my son a major challenge! Probably one of the Top 5 challenges ever. One thing is always on my mind, lingering like a cold virus that won't let go -- What to pack, what to pack?? To top it, I keep constantly wondering whether the warm lunch I pack for my little one stays warm until lunchtime.Eating warm food isn't just for adults, you know. Kids love to eat warm foods too. My son eats an extra bite or 2 if the food is warm, especially in the winter.  The pre-school he goes to doesn't warm lunch for kids. :(   That is so sad!

    While the "Thermos" lunch box promises to keep food warm for "n" number of hours I don't really know. I haven't put it to test. But I do ensure that I do everything on my side to make sure the food is warm until noon. This trick is something that I learnt from a fellow pre-school mom. I am open to ideas and if you have a better trick up your sleeve, feel free to share it in the comment section. 

    Re-cap of what I posted for the "How To" theme this week:
    Procedure:
    • Pick any thermos lunch box. Pour hot bubbling water into the box up to the "inner rim". 
    • Close the lid tightly. But opening is a bit difficult due to steam.
    • When the food is ready to be filled up, discard the hot water and wipe the insides clean with paper towel. The insides of the thermos will be hot and that is the way we want it.
    • Immediately transfer the hot/warm food into the box and close it.
    • This simple step will help the Thermos do its job better. Atleast that is what I think. 
    Hope this helps!!
    Read More...