Pages

Saturday, December 31, 2011

Best of 2011, "My Favorite Fifteen" from Pan Gravy Kadai Curry

I wish all my beloved readers a very Happy and Prosperous New Year 2012!!

As another year comes to an end, I fondly look back to  see what I posted this year and pick out "My Favorite Fifteen" recipes. Every recipe was created and shared with great love and care. So believe me when I say narrowing it down to 15 from 100+ posted recipes was tough. So here is what made the "Top 15" list -
  1. First "Food" Post of 2011: Boiled Fruit Cake

  2. Best Photo (According to me anyway): Beet Sliders, from scratch

  3. Most Enjoyable Baking(I baked with friends, sharing jokes and tips, ordering them around to weave the Lattice crust for me..Oh, yeah, it was most enjoyable! Esp, the bossy part): Lattice Crust Topped Berry Tart

  4. The recipe that nearly drove me to tears(With all the layering of cake batter to achieve the perfect zebra pattern,it was indeed nerve-wracking that I wanted to bawl..badly! Phew!): Zebra Cake

  5. The dish that impressed me even before I tried(Love the name, Love the taste): Kenyan Sukuma Wiki With Collards and Ground Turkey

  6. Favorite "Sweet" Breakfast #1( I "Heart" this Muffin. Bigger is better, in this case!): Heart Shaped Jumbo Banana Nut Muffins

  7. Favorite "Sweet" Breakfast #2(This recipe's success made me feel like I climbed Mt.Everest): Egg-less "Flaxseed Meal" French Crepes with Banana Nutella Filling

  8. Favorite "Savory" Breakfast #1(A protein packed nourishment for a perfect start! Yeah, baby, pass me the plate!): Sunday Morning Hash with Spanish Olives and Potatoes

  9. Favorite Vegetarian Dish(Making everything from scratch is good for the body and soul. Very rewarding dish! Love the colors!!!): Ragi Noodles/Spaghetti  with Loads of Veggies

  10. Favorite Chicken Dish #1(A treat for anyone who loves sweet and savory in the same bite!): Easy Pineapple Chicken Curry

  11. Favorite Chicken Dish #2(This spicy chicken dish can ward off Winter Blues at the very first bite!): Chicken In Pickling Spices "Achari Murgh"

  12. Recipe that helped me get over the fear of Yeast( An ice-breaker! What a lovely post, if I have to say so myself..it helped me forge a path and now there is no turning back on Yeast): Sweet-Potatoes and Veggies Stuffed "Palya/Masala" Buns/Rolls

  13. Recipe that cracks me up everytime I hear its name(LoL, RoFl, LoL!): Pasta Puttanesca "Slut's Spaghetti/Whore's Pasta"

  14. Recipe that was most appreciated by Family, Friends and PGKC's Readers(A real joy to eat and look at!): Red Matta Rice Pancakes

  15. Favorite "Savory" Breakfast #2(Fiber Up, Darlings!): Rolled Oats Porridge with Veggies
Sending this entry to Srivalli's "Best of 2011" Event.

Enjoy!
Friday, December 30, 2011

How to Pack Lunch For Kids

BM#11I was intending to post something else for today but that experiment went awry. Oh, Bummer!! Ergo, I didn't want to post something that didn't end up right. This was the backup post that I have been intending to post sometime next year! But you all get to see it this year itself! Sweet, no??

I find packing lunch  for my son a major challenge! Probably one of the Top 5 challenges ever. One thing is always on my mind, lingering like a cold virus that won't let go -- What to pack, what to pack?? To top it, I keep constantly wondering whether the warm lunch I pack for my little one stays warm until lunchtime.Eating warm food isn't just for adults, you know. Kids love to eat warm foods too. My son eats an extra bite or 2 if the food is warm, especially in the winter.  The pre-school he goes to doesn't warm lunch for kids. :(   That is so sad!

While the "Thermos" lunch box promises to keep food warm for "n" number of hours I don't really know. I haven't put it to test. But I do ensure that I do everything on my side to make sure the food is warm until noon. This trick is something that I learnt from a fellow pre-school mom. I am open to ideas and if you have a better trick up your sleeve, feel free to share it in the comment section. 

Re-cap of what I posted for the "How To" theme this week:
Procedure:
  • Pick any thermos lunch box. Pour hot bubbling water into the box up to the "inner rim". 
  • Close the lid tightly. But opening is a bit difficult due to steam.
  • When the food is ready to be filled up, discard the hot water and wipe the insides clean with paper towel. The insides of the thermos will be hot and that is the way we want it.
  • Immediately transfer the hot/warm food into the box and close it.
  • This simple step will help the Thermos do its job better. Atleast that is what I think. 
Hope this helps!!

Thursday, December 29, 2011

How to Make Oat Flour from Old-Fashioned Oats

BM#11I wanted to have Oat Flour handy so I can make Oat Flour Pancakes and Muffins for my son. I am yet to put that thought into action cause am still in the process of searching the web for a good recipe that uses Oat Flour. As for making Oat Flour, its easy breezy! See for yourself!

Procedure:
  • Add 1 Cup Old-Fashioned Oats (I used Quaker Brand) into a blender.
  • Run the Blender at medium speed for a couple of minutes until the oats are of a fine powder consistency.
  • Sift the flour using a sifter. 
  • The coarse oats will have to be blended again and sifted until you run out of the gritty ones. It is as simple as that. 1 Cup of whole old-fashioned oats yield "nearly" 1 Cup of fine Oat Flour.
  • Use it to make pancakes, muffins, cookies or any other bakes of choice. I have been eyeing this Oat Flour Cranberry Muffins for a while now. Perhaps I should go ahead and make it. 
Enjoy!

Wednesday, December 28, 2011

How To Cut Open, Scrape and Freeze Fresh Coconut

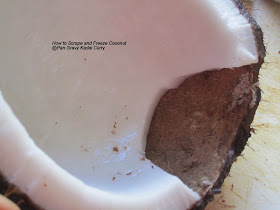
BM#11 Fresh scraped/shredded Coconut plays a major role in Indian cooking. It is used for making Coconut chutney, Coconut Rice, making ground masala for curries,as a garnish, for extracting Coconut Milk etc etc. Since we are all under time crunch, the optimal thing would be scraping and freezing it in a large scale. MIL taught me to freeze them into golf size balls rather than a slab cause it is much easier to thaw these smaller portions.

Procedure:
  • To cut open the coconut you need a heavy (iron) rod and another heavy rod with a sharp hook at one end ( like in the picture) to pry the flesh from the shell.
  • To crack the coconut, hold it in your left hand and smack it in the center to cause a fissure. Rotate and repeat to create a hairline fissure all around it.  
  • Don't discard the water.
  • Filter the water and drink it as is.Don't waste it. It tastes heavenly and it also cools the body. Perfect drink for summertime! From this coconut I got nearly 2 cups. Lucky day and I felt blessed!
  • Now use the rod with a hook to put deep cuts into the flesh of the coconut all the way down the shell.
  • Seperate the coconut pieces from the shell by giving a little nudge from underneath the flesh. Some brute strength is needed!
  • The brown rind on the underside of the coconut is edible. So most of the times I leave it. Wash the pieces and pulse in a food processor.  
  • Optionally the rind can be peeled or shaved to yield a much whiter coconut flakes, if desired. 
  •  Make small golf-sized balls and line in a box.
     
  •  Freeze immediately.It stays fresh for upto 2-3 months. Usually it doesn't last that long in my house as I use coconut in everyday cooking.
  • Frozen coconuts in shapes of balls are much easier to seperate and thaw.
Tips to buy a Coconut that hasn't spoiled:
  • Pick coconuts with shells that are light brown in color. The darker the shells the older they are.
  • Shake the coconut to make sure there is water in it. Presence of water is an indication that the insides aren't spoiled.
Some recipes that use Coconut:


Enjoy!

Tuesday, December 27, 2011

How To Boil Eggs

BM#11Boiling an egg might sound like an easiest thing to do but that is not the case. For picky folks like me and my son, slightly overcooked or under-cooked egg would mean that it is going into the garbage. So I use this method to always end up with perfectly boiled  eggs.

Procedure:
  • Choose eggs that are slightly aged. Farm fresh eggs aren't best for making boiled eggs. We need eggs that have a thicker membrane so as to not break before they are perfectly cooked. 
  • Pour cold water, not hot water into the pan and add a dash of salt. The water should completely immerse the eggs. Bring the pot to boil on a medium high heat. Boiling them at high flame initially would agitate the eggs and they may break and leak. Once the water starts to bubble and boil, switch off the stove(It will take about 8-10 minutes for the water to get to this stage). Lid the pan and leave it as is(on the stove) and let the eggs sit in the hot water for 12-15 minutes.
  • After 15 minutes, take a sharp knife and "gently" tap the eggs to create fine cracks.
  • Drain the eggs and fill the pot with cold water. Let the eggs sit in it for 5 minutes or so. Cold water will loosen up the egg's membrane under the shell making it easier to peel.
  • Tap and peel from the larger end. It is much easier. Now you have perfectly boiled eggs.
Note:
  • Here is an example where the clingy membrane makes for an unevenly peeled eggs.
A few Egg Dishes:

Perfectly Boiled and Fried Egg:
Spicy Egg, Potato and Red Pepper Curry:
Enjoy!