Pages

Monday, April 23, 2012

Idli "Steamed Rice Cakes" With Red and Green Chutney

Day1: This week I will be posting about fermented foods. I thought I will start off with the easiest one - something that I ate growing up right from when I was in my nappies.Mom told me it was my first solid dish. She said she fed me soft Idlis dipped in warm cow's milk.  It is the classic "South Indian Idli", one of the healthier breakfast option cause it is steam cooked. Babies, adults, old folks all eat Idli cause it is easily digestible. And because it is bland it marries well with just about any side dish - chutney, chutney powder, dhal, sambhar, meat and seafood based dishes. So according to me and million other Indian folks, Idli is a wonder dish. :-).


Before I go ahead with my recipe, I want to share with you what I might like to receive this Mother's Day. Since my likes are way too lofty, I am thinking most of them will remain in the list. But at-least they make my post attractive. Husband, take note-

#1 in the Lust List: Tiffany & Co. Schlumberger Turquoise Necklace ($US 7200.00)
 Tiffany & Co. Tiffany & Co. Schlumberger Turquoise Necklace
Isn't that a cool necklace or what? Oh, how it would pair well with all the summery whites. Hubby would never agree to invest so much on beads, even if it is from Tiffany's.

Now onto to the recipe-
Ingredients:
  • 4 Cups Parboiled Rice (or) Idli Rice
  • 1 Cup Shelled Whole Black Gram "Urad Dhal"
  • A pinch of Baking Soda
  • 1 Tbsp Salt (Do not use "Iodized Salt" as it inhibits fermentation)
Tools:
  • Wet Grinder Or a heavy-duty Blender
Procedure:
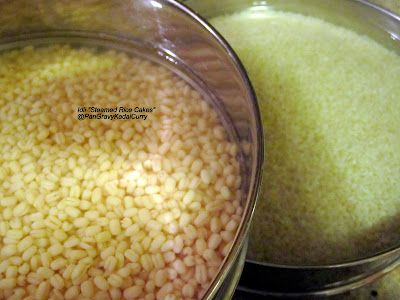
  • Soak the rice overnight and the Black Gram for at-least 4 hours.
  • Grind the black gram to a smooth paste in a wet grinder or a heavy duty blender with little water. Remove it to a storage container. Grind the soaked rice adding little water periodically. The rice should be 90-95% ground.
  • Move the batter the same storage container.Add a pinch of soda. Using ladle or clean hands, mix the ground batter. If using salt, use non-iodized salt. Else salt may be added after the batter is fermented. The storage container should have plenty of space for the batter to raise. The batter doubles up in volume. Store the container in a warm spot, like inside an oven.
  • Let it ferment overnight. In cold places, it sometimes takes a day and a half to properly ferment. Keep a watchful eye on the batter else the batter might overflow, like in the picture. The batter for this recipe will make enough Idlis for a large crowd. 
  • Take small portions of the fermented batter, add salt if it wasn't added prior to fermenting. The fermented batter is thick and frothy. Mix with little water.
  • The batter should be neither thick nor runny. 
  • Spray/Smear the Idli pan with little oil and fill up the wells with batter. Using a special Idli steamer, steam the Idlis for 10-15 minutes. If you don't own an Idli pan, use an Indian pressure cooker, remove the cooker weight and steam the Idli's for 10-15 minutes.
  • Cooked Idlis look like plush pillows. 
  • Serve it hot with Red Chutney and Green Chutney, or any side-dish of choice.
Spicy Onion Chutney:
Ingredients:
  • 1 Large Red Onion, peeled and roughly chopped
  • 3 Dry Red Chili or less/more
  • 1/2" Ginger, peeled and finely chopped 
  • 1 Roma Tomato
  • 1 Stalk Curry Leaf
  • Marble-sized Tamarind, cleaned and seeds removed
  • Salt, as needed
  • Oil as needed
  • 1/4 Tsp Mustard seeds, for tempering
Procedure:
  • Fry all the ingredients in a little oil except the mustard seeds. The Onions should be well fried.
  • Cool and grind it to a coarse paste. Temper the mustard seeds in a little oil and pour it over.

Refreshing Mint Chutney:

  • A plate of hot steaming Idlis with Red and Green Chutney is served-
Note:

  • The Black Gram draws wild yeast from the air and that is how the batter is fermented.
  • After fermentation, refrigerate the batter. It keeps well for up-to a week.
  • During winter I sometimes turn on my oven @ 200 degrees F for 5 minutes and then turn it off. A few minutes later I stick my batter into the warm oven to help the batter ferment.
Blogging Marathon page for the other Blogging Marathoners doing BM#15
Read More...

Sunday, April 15, 2012

Eggless Breakfast Pumpkin Walnut "Jumbo" Muffins

Had some leftover pumpkin puree from making a variant of these lovely pancakes, so decided to make some pumpkin walnut muffins. So here you go-

Ingredients(For 4 "6 oz" Jumbo Muffins):
  • 1-1/2 Cups All Purpose Flour
  • 3/4 Cup Pureed Orange Pumpkin
  • 3/4 Cup Granulated Sugar
  • 1/2 Cup Walnuts, toasted and roughly chopped
  • 3/4 Tbsp Baking Powder
  • 1/8 Tsp Salt
  • 1/4 Tsp All Spice powder
  • 1/4 Tsp Pumpkin Pie Spice powder
  • 1/4 Cup Nonfat Yogurt
  • 4 Tbsp Melted Butter
  • 1 Tbsp Olive Oil
  • 2 Tbsp "Wild Flower" Honey
Other:
Procedure:
  • Sift together flour, spice powder, baking powder in wide bowl. Stir salt and sugar using a whisk.
  • Add the pumpkin puree, butter, oil. Mix gently with a spatula.
  • Add the honey and fold in the 3/4 of the chopped walnuts. Save some for topping the muffins.Don't over-mix.
  • Preheat the oven to 350 degrees F. Grease the insides of the ramekins. Divide the muffins between the ramekins.
  • Bake for 35 - 38 minutes( I baked in the bottom rack for 18 mins and middle rack for 20 minutes).
  • Let the muffins cool for 10 minutes before removing it from the ramekins. 
  • Here you go-

Enjoy!
Note:
  • Cling wrap the muffins and refrigerate the muffins for the following day. Yum with a cup of coffee.

What else can you make with Pumpkin Puree: Downeast Maine Pumpkin Bread With Mini Chocolate Chips
Read More...

Saturday, March 31, 2012

"Dum" Biryani, With detailed pictures

Last week I was caught up in the frenzy of many things -- The "Seasonal allergy" frenzy(Must have kick started from the day I stood under the Cherry Blossoms tree in Washington D.C), "Work related frenzy(it was a super busy week)", "Blogging Marathon" Frenzy and lastly the "Mega Million" Frenzy. So did you guys buy the lotto? Me and my hubby bought 10 tickets which led me day-dreaming about things that I would and wouldn't do if I won the $640 million lotto. And I definitely thought to myself that I would do my best not to self-destruct or go bankrupt like some of the lucky winners in the past. That bubble burst yesterday night after the lottery drawing time. He He. Its okay, there is always next time.

Before I go to the main topic of this post, I wanted to recap what I posted for BM#14-
It took me a long time to ready this post..longer than it took for me to cook this dish.LoL..Mostly because of the # of pictures. It is indeed a photo-laden post. Why so many? Well, this dish deserves it. And I won't lie to you, this is not an easy breezy dish to make, mainly due to the "long winded" process. From the pictures you will understand why - a lot of industrious effort and considerable amount of love went into making this aromatic, tongue-tickling dish.

This Indian dish,Biryani, of "Persian origin" brought to India by Iranian merchants/travelers,  is a one pot wonder made with rice, vegetables (or) vegetable + meat/pultry/seafood combo, seasoned with a fragrant blend of spices and eaten along with Raita. Dum Biryani, a slow-cooked biryani with layers of rice and seasoned vegetables(+/- meat/chicken/seafood) is made in a pot that is completely sealed with a ring of wheat dough and cooked over indirect heat for about 30 minutes or so to promote even cooking. The flavor infusion is phenomenal when cooked this way and the end result is sure to hit all the right spots. As most of you know, India is a country well known for its spices and there isn't a dish that celebrates the harmonious blend of spices more than Biryani.

For making this Dum Biryani, you will need a good quality, thick bottomed casserole with lid, like my trusty 4-Qt All-Clad Casserole to prevent charring/burning at the bottom. While there are many dishes where charring is plus(Charred tacos, Charred Vagetables..I know there is a huge fan-following for charred dishes..), this dish is not one of them. Every grain of rice and the other ingredients should be moist, juicy, tender, succulent..you get the idea?? Please do me a favor and eat this Biryani with hands, just the way it was meant to be relished.

Sending this as a last minute entry to Indian Food Palooza. 


Ingredients(Serves 6-8):
  • 3 Cups "Aged" Basmati Rice,cleaned and soaked in cold water 30 minutes prior to cooking( I used the brand "India Gate" 1-yr old aged rice)
  • 8 Chicken Thighs, skinned and cut into bite size pieces
  • 2 Medium Red Onion, peeled and vertically slit
  • 2 Roma Tomatoes, cut into big chunks
  • 10 Hot Green Chili, pierced at several places
  • 2 Tbsp Ghee "Clarified Butter"
  • 2 Tbsp Coriander Powder
  • 1/2 Bunch Cilantro, chopped
  • 1/4 Cup Whole Milk
  • 8 Stalk Mint,leaves picked and chopped
  • Whole Spices: 5 Bay Leaf + 1/2 Stick Cinnamon + 1 Star Anise + 4 Cloves + 3 Cardamoms 
  • Olive Oil
  • Salt, as needed
For the Green "Ground Masala":
  • 1 Small Bunch Cilantro, cleaned
  • 1/2 Yellow Onion
  • 2 Hot Green Chili
For the "Ground Spices":
  • 3 Cloves
  • 1 Cardamom
  • Tiny piece of Cinnamon Stick
  • 1/4 Of Star Anise
For the "Chicken Marinade"
  • 3 Tbsp Thick Yogurt
  • 1/2 Tsp Turmeric Powder
  • A few grinds of Pepper
  • 1 Tsp Lemon 
For "Lining the pan" 
  • Wheat Flour
  • Water to make a dough out of the wheat flour
Procedure:
  • Marinate the cut and cleaned chicken with the ingredients under "Chicken Marinade". Marinate it anywhere from 4 hours to over-night.
  • Finely grind the spices under "Ground Spices" using a mortar and pestle. Note: Grinding the spices intensifies the flavor.
  • Cut, Chop the vegetables for the biryani.
  • Clean and ready the ingredients for the "Green Ground Masala".
  • Grind it to a fine puree with very less water.
  • Soak the rice in cold water for 30 minutes. 
  • Drain the rice completely. Spritz some oil in a non-stick pan and fry the rice "gently". Soaked rice are prone to breaking.
  • In a deep casserole dish, add about half a gallon of water. Don't worry about exact measurements because the rice is getting cooked for 8-10 minutes and getting drained of that water. Add a few drops of oil and little salt to this water and bring to a roiling boil. Add the fried rice and cook with lid for about 8 minutes. Don't go beyond 10 minutes because we want the rice to be "under-cooked" for the time being.
  • After 8-10 minutes of cooking, drain the rice immediately. Spread it on a wide plate and let it cool.At this point the rice is 60-70% cooked.
  • Meanwhile, heat the oil and ghee in a wide non-stick pan. Then add the ground spices, whole spices and the small garlic cloves to the pan.
  • Add the mint leaves, onions to the pan. Brown the onions. Please make sure the onions are well and truly browned.  It is very essential for a good biryani.
  • Once the onions are browned, add the slit green chilies.
  • Follow-up with the tomatoes. Lid the pan and let it cook for about 5 minutes on a medium flame.
  • Add the coriander powder and stir the mixture well.
  • In goes the green ground masala. Sprinkle salt as needed.
  • Add the marinated chicken pieces and stir well to coat it with the mixture in the pan.
  • Add the milk. mix and let the chicken cook for about 15 minutes. Check for taste, add chili powder or salt if needed.
  • Add a portion of the chicken mixture to thick-bottomed pan.
  • Top it with the partially cooked rice.
  • Keep alternating between the rice and chicken mixture. When finishing up, rice should be at the top. Garnish with chopped Cilantro and Mint. There are "two" ways to seal the pan: 1. Coat the rim with little oil, make a dough, roll and line around the rim. Lid the pan and seal it shut. 2. Lid the pan, smear with a little oil and seal it by lining the dough from outside. I went with #1.
  • After the pan is sealed shut, add weight on top. Dum Technique:  Cook at low flame in indirect heat. I placed a cast-iron griddle/tava, then place the pan atop the tava. Add weights to the top(Optional). I placed my heavy mortar and pestle on the top. Cook at low flame for 25-30 minutes.
  • Optional but highly desired: While the biryani is cooking on Dum, fry some thinly slit brown onions.


Enjoy!
Read More...