Pages

Tuesday, March 22, 2011

Homemade Chocolate-Blueberry Belgian Waffles with "Presto Flipside" Waffle Maker

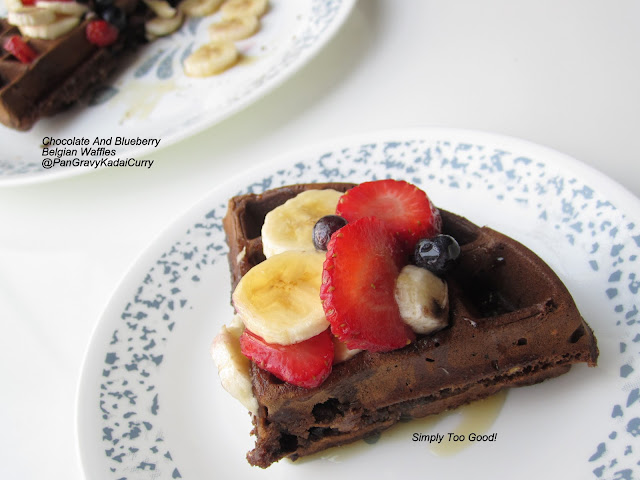
A few weeks ago I bought this Presto Flipside Belgian Waffle Maker from CSN Stores to try my hand at making homemade waffles.My son has been looking forward to home-made waffles ever since this package arrived at our doorstep.I am so happy with the purchase because this waffle maker makes some awesome thick Belgian Waffles that is crunchy on the outside and soft on the inside..just how a nice waffle is supposed to taste like. I used the same Krusteaz Pancake mix that I used for making my Butternut Squash Pancakes that I posted a couple of weeks ago but jazzed up the batter with some Dutch processed Cocoa Powder and frozen blueberries. And I topped my perfectly perfect pancake with cut-up banana, strawberries,blueberries and of-course a healthy drizzle of maple syrup. Yum-O!

Ingredients(For 3 Scrumptious Belgian Waffles):
  • 2 Cups Kruteaz Pancake Mix
  • 1-1/2 Cups + 2 Tbsp Skimmed Milk
  • 3 Tbsp Granulated Sugar (Add 1 Tbsp more if you like it really sweet)
  • 3-4 Tbsp Dutch-processed Cocoa Powder
  • 2 Tbsp Olive Oil
  • 2/3 Cup Frozen Blueberries
Procedure:
  • Preheat the Waffle-maker for about 5 minutes.
  • Make the batter by mixing all the ingredients and stir enough to combine. Its okay if the batter is lumpy. Let it sit for about 5 minutes or so.Pour them into a measuring cup/batter bowl or any bowl that has a spout to conveniently dispense the batter.
  • Grease the insides of the waffle-maker with a oil dipped paper and pour about 3/4th of a cup of batter.
  • Close the lid and set the timer for 4 minutes.
  • Now flip the handle from right to left.
  • Cook the waffle for 4 minutes. The timer will beep when the time is up. There will be steam arising from the sides which pretty much stops around 4 minutes..If steaming hasn't stopped continue to cook for half minute - minute more.
  • Open lid and be ready to clap eyes on a perfect homemade waffle. Those purplish stains on the waffle are the nothing but blueberry stains. 
  • Use a steak knife to loosen the edges and lift the waffles.
  • Repeat the above steps for the remaining batter. Batter should be sufficient to make 2 more.
  • Top the warm waffles with choice of fruits and a healthy drizzle of maple syrup.
Nothing beats homemade waffles.So what are you waiting for? Hurry up and get yourself one from CSN Stores that has a wide selection of Waffle-makers.

Enjoy!
Read More...

Wednesday, March 16, 2011

Whole Wheat Bread Pudding With Banana and Blueberries

Plenty of stale bread and a gloomy day last week called for something warm, something mushy and something sweet. I couldn't think of anything better than a bread pudding to cozy me up.I warmed up some maple syrup,drizzled it lovingly over the pudding and relished it spoon after spoon watching hopelessly as my portion size started diminishing and finally disappearing..Sadly I couldn't reach for seconds as I had packed the rest to be taken elsewhere. The base recipe was from here, which I modified to suit my taste buds.If you like bread pudding and if you like chocolate then make sure to try my "Chocolate And Sweet-Bread Pudding" that will knock your socks off.
Sending this as an entry to Versatile Kitchen's "Bake Off" event.

Ingredients:
  • 10 Slices of Stale "Whole Wheat Bread"
  • 3 Large Eggs, whisked
  • 2 Cups Skimmed Milk
  • 1 Cup Whole Milk
  • 1-1/2 Cups Fresh or Frozen Blueberries(I used Frozen)
  • 3/4 Cup Granulated Sugar(add 1/2 Cup if you like it less sweet)
  • 3 Tbsp Honey
  • 1 Tbsp Butter, melted
  • 1 Ripe Banana, roughly mashed
  • 1 Tsp Vanilla Extract
  • 1 Tsp of Whole Wheat Flour
  • A pinch of salt
  • A little butter for greasing the baking dish 
    Procedure:
    • Preheat the oven to 350 degrees F.
    • Toast the bread slices in a toaster.
    • Butter and prep a 11 X 7 inch baking dish. Cube the toasted slices and add it to the baking dish.
    • In a large bowl combine whisked eggs, milk, sugar, vanilla extract and a pinch of salt.
    • To it add the mashed bananas,honey and whisk them all together.
    • Pour over the cubed bread slices and let it soak for about 20-30 minutes.
    • Meanwhile dust the blueberries with a tsp of whole wheat flour.
    • Top the bread and egg mixture with dusted blueberries.
    • Bake in the oven for 50- 60 minutes or until knife inserted at the center comes out clean.
    • Remove from the oven. It should look mushy/something similar to this:
    • Serve it warm with dusting the top with confectioner's sugar or drizzle some maple syrup on the top which is how I prefer to eat.
    • Umm, Umm, Gooddddd..
    Makes 8-10 servings.

    Note:
    • Feel free to substitute a banana for an egg. But its better to use at-least two eggs for this recipe. 
    • Don't skip the maple syrup drizzle.It does wonders to the pudding.
    Enjoy!
    Read More...

    Monday, March 14, 2011

    Fabulous "Cast-Iron Pan" Pepper Chicken

    I hate the idea of "Springing forward" even before the advent of Spring. I hate it, period! Are you with me? Are you like me? I constantly wonder about the things I could have accomplished in the lost hour. Well you won't see me complaining six months from now when we gain an hour. LoL

    Coming to the Chicken dish, this is probably one of the easiest anyone can make. I say so because it is a lot less complicated that even beginners can ace.Yo sis, if you are reading this, then you know what I am talking about. I know a lot of people don't have tolerance to Chilies and other spice..Well, this recipe won't upset anyone's stomach cause the heat factor comes from only one source -- Crushed Peppercorns. My hubby loves this Pepper Chicken. He would have loved it even more if I used cut chicken so the gravy coats every inch of every chunk. Well, I was a bit lazy over the weekend so I used the drumsticks. But you may use thighs or breasts, whole or cut-up..It tastes good anyhow.Just make sure to use a cast iron pan to make this. It adds flavor to the dish and keeps the chicken juicy. Yum Yum!


    Ingredients:
    • 10 Chicken Drumsticks
    • 1/2 Medium Yellow Onion, finely chopped
    • 1/4 Cup Crushed Canned/Fresh Tomatoes, Pureed ( I used Canned Tomatoes)
    • 1 Tbsp Coriander Powder
    • 1-1/2 Tsp Crushed Pepper or as needed
    • 3 Tbsp Olive Oil
    • 2 Tbsp Olive Oil for browning the chicken
    • Salt as needed
    For the Marinade:
    • 4 Tbsp Thick Yogurt
    • 4 Cloves Garlic, minced
    • 1/2" Ginger, minced
    • 1/4 Tsp Turmeric Powder
    • 1/8 Tsp Salt
    • 1/2 Tsp Crushed Pepper
    Tool:
    • A well-seasoned Cast-Iron Pan
      Procedure:
      • De-skin the drumsticks.Clean them and put one or two deep slit(s) on the flesh.
      • Combine all the ingredients for the marinade in a wide bowl. Add the chicken and make sure its coated evenly with the marinade. Also make sure to apply inside the slits. Marinate in the refrigerator for 2-3 hours.
      • Add 2 tbsp of olive oil to the cast-iron pan and brown the chicken in batches. Takes about 2 minutes per batch to brown them evenly.If the pan is too hot it might stick a little bit. But never you mind. Those sticky bits make for a nice gravy.
      • Transfer the browned drumsticks to a plate. Set aside.
      • In the same pan, add the remaining 3 tbsp of oil and add the chopped onions. Once browned, add the tomato puree,coriander powder and a little crushed black  pepper.
      • Once the tomato loses raw smell and a gravy is formed add the chicken pieces.
      • Stir well to coat the chicken with gravy.
      • Add salt and (more) black pepper as needed. Stir and lid the pan. Do not add water. Cook for 7-8 minutes.
      • The chicken generates its own steam. Stir midway and cook for 7-8 more minutes.
      • Open the lid and let all the moisture evaporate. A thick gravy coats the chicken.
      • Serve the chicken with piping hot rice or with some salad on the side.

      Enjoy!

      Read More...

      Friday, March 11, 2011

      Savory Oatmeal Porridge With Veggies

      While I love to eat my Oatmeal with plenty of dates and mixed berries in the morning, MIL didn't relish the idea of eating such a sweet breakfast. So I initially made this savory version a few months ago, with plenty of vegetables, which closely resembles "Rava Kichidi/Kedgeree" that everyone loves in the family..Hubby polished off the whole bowl in under five minutes with a dash of hot sauce. MIL took an instant liking to this dish and persuaded me to make it often to which I happily obliged. When she flew back home,she left with huge cartons of rolled oats from Costco. Now she fondly tells me how she and FIL eat this on a weekly basis.
      While MIL and I didn't necessarily vibrate in the same frequency all the time, she and I had a few things in common.. One being that she loved to experiment with food and so do I. We were exchanging plenty of recipes and it was a very good learning experience for me. Today while I was talking to her she asked the recipe for my favorite Red Lentil Soup that I had made while she was visiting. She said she was thinking about including it as a new breakfast option. Now I am already looking forward to her next visit where I plan on treating her to many different cuisines and tickling her "Very Indian" Palate. :)

      Ingredients(For 5-6 Servings):
      • 2 Cups Rolled Oats
      • 2 Medium Carrots
      • A handful of Green Haricot Beans
      • 1 Large Red Onion
      • 3-4 Hot Green Chilies
      • 1/4 Cup Fresh or Frozen Green Peas
      • 2 Cloves Garlic
      • 1/2 Tsp Mustard Seeds
      • 3-1/2 Cups Warm Water
      • 1/2 Cup Milk or more
      • 3 Tbsp Olive Oil
      • Salt as needed
      Procedure:
      • Peel the Carrots and cut into matchsticks. Halve the beans and cut them into 1" length pieces. Cut the onions and green chilies vertically. Roughly mince the garlic.
      • In a pan, heat 3 tbsp of oil and add the mustard seeds. When they start sputtering add the onions and saute till translucent.Soon-after add the green chilies,minced garlic and fry for a minute or so.
      • Throw the cut carrots and beans and fry for 4-5 minutes.Stir in the green peas.
      • Add the rolled oats to the pan and fry for a minute.
      • Pour the warm water and milk. Sprinkle in the salt and lid the pan. Cook for 4-5 minutes or until the oats are cooked.
      • Add more milk if a gooey consistency is preferred.Check for taste and add more salt if necessary. Add cracked pepper for a more robust flavor.
      • Transfer to a serving bowl immediately and eat while its pleasantly warm.
      Makes 5-6 Servings.

      Enjoy!
      Read More...

      Wednesday, March 9, 2011

      Butternut Squash Pancakes

      Look at the vibrant color of these pancakes.Thanks to the Butternut Squash Puree, it jazzes up an ordinary pancake and adds some sweetness too. My fussy kid actually looks forward to eating a few of  these delicious fluffy pancakes in the weekends. Yes, a simple creation that can be extremely rewarding to the taste buds and the moms of fussy kids, if you ask me. For this recipe, I had used the pancake mix but you may very well try making it from scratch by incorporating the puree in any of your classic pancake recipes.
      If you are a pancake lover like me,stay put and check my version of  "Banana-Berry Pancakes" Or "Strawberry Topped Cocoa Pancakes" as well.
      Ingredients( For ~7, 5" Pancakes):
      • 1-1/2 Cups Pancake Mix (I used Krusteaz "Light & Fluffy" Buttermilk Pancake Mix)
      • 1-1/4 Cups Skimmed Milk
      • 1 Cup Butternut Squash Puree
      • 1 Tbsp Olive Oil
      • A pinch of Cardamom Powder (Optional)
      To Make Butternut Squash Puree(Yields ~1-1/4 Cup Puree):
      • 2-1/4 Cups Butternut Squash chunks
      • 1-1/2 Tbsp Water
        Procedure:
        • Pressure cook the Butternut Squash chunks with a Tbsp of water until its fork tender.
        • Puree/Mash the cooked chunks while still warm. 
        • Mix all the ingredients - Pancake mix, Oil, Squash puree, Cardamom powder and milk - just until they are combined. Its okay for the batter to have lumps.
        • Heat a non-stick pan/griddle, grease with little oil and pour a ladle-ful of batter(4-5 Tbsp). Spread the batter until the pancake is about 5" in diameter. If using a non stick pan, swirl slightly.
        • Cook the pancakes for about a minute or so on a low-medium flame and turning only once.
        • Cook the other side for a minute.Repeat the above 2 steps for the remaining batter and stack the pancakes one above another to keep it warm.
        • Serve the warm stacked pancakes stacked with maple syrup.
        Makes  7, 5" pancakes.

        Enjoy!
        Read More...