Pages

Friday, July 27, 2012

Fabulous Baby Potatoes Curry

A quick round-up of what I posted this month before I share with you all the yummy potato curry:
Week1: Cake/Cupcake Decoration/Frosting
Week2: Biryani/Pulao Varieties
Week3: Basics
Week4: Dry Curries

 Ingredients:
  • 1 Sack Baby Potatoes (~22-25 potatoes)
  • 1 Medium Red Onion
  • 2 Medium Ripe Roma Tomatoes
  • 1 Tbsp Ginger Garlic Paste
  • 1/2 Tsp Cumin seeds
  • 1 Tbsp Coriander Powder
  • 1 Tsp Garam Masala Powder
  • 1 Tsp Chili Powder less/more
  • 1/2 Tsp Cracked Black Pepper
  • 1/4 Tsp Turmeric Powder
  • 1/3 to 1/2 Cup Water
  • Olive Oil for cooking
  • Salt as needed
  • Cilantro for Garnish 
For Tempering:
  • 1/4 Tsp Mustard Seeds
  • 1 Stalk Curry Leaves
  • 2-3 Pricked Green Chilies
Tools:
  • Cast-Iron Pan/Kadai
 Procedure:
  • Scrub and wash the baby potatoes.
  • Boil the potatoes with skin until they are fork tender.Set aside to cool.
  • Finely chop the onions and tomatoes. In a cast iron pan, add about 3 tbsp of Olive Oil and add the cumin seeds. Add the chopped onions and saute till they are lightly brown. Now add ginger-garlic paste and fry till they lose the raw smell.
  • Add the tomatoes and the powders. Mix to incorporate.Add water and lid the pan. Cook for 5-8 minutes until the tomatoes are onions lose shape. 
  •  Sprinkle salt and check for taste. Add salt if needed. Throw in the potatoes and reduce the flame.
  • Continue to saute until the gravy thickens and starts to cling to the potatoes. 
  • Switch off the stove. In a separate pan, temper mustard seeds, curry leaves, 2 green chilies in a Tsp of Oil and pour it over the potatoes. Mix gently.
  • Transfer to a serving dish and garnish with cilantro.

Enjoy! 
Check out the Blogging Marathon page for the other Blogging Marathoners doing BM#18
Read More...

Wednesday, July 25, 2012

Raw/Green Papaya And Red Bean Curry

Inspired by this recipe, I set out to make this curry and I have been frequently making this since last year with different types of lentils and beans. A wonderful curry with unusual combo of raw papaya fruit and lentil.
Ingredients:
  • 1/2 Cup Red Bean, soaked for 3-4 hours
  • 1 Raw/Green Papaya
  • 2-3 Tbsp Chopped Red Onions
  • 1 Tsp Mustard seeds
  • 1 Tsp Split Hulled Black Bean/ Urad dhal
  • 1/2 Tsp Cumin Seeds
  • Olive Oil for Cooking
  • Salt, as needed
For Grinding:
  • 2-3 Dry Red Chilies
  • 1/2 Tsp Peppercorns
  • 2 Green Chili
  • 2-3 Garlic Cloves
  • 4 Balls of Grated Coconut
  • 1/2 Tsp Turmeric Powder
  • 1 Tbsp Coriander Powder
  • 1 Stalk Curry Leaf, Optional
Procedure:

  • Pressure cook the red bean with little water and salt until it is well-cooked and soft but not mushy. 
  • Peel the raw/green papaya and cut it into small bite-size pieces.
  • In a pan, add 3-4 tbsp Olive oil and temper the mustard seeds, urad dhal and cumin seeds. Add the chopped onions and saute till translucent.
  • Now add the cut papaya and 1/2 cup water. Lower the flame to medium and cook the papaya for 5 minutes.
  • Drain the cooked red beans and add it to the pan.
  • Grind to a coarse thick paste all the ingredients under "For Grinding"
  • Add it to the pan and stir ti incorporate. Add more water, salt and check for taste. 
  • Lid the pan and cook for 5 more minutes until all the water evaporates.
  • This delicious and nutritious curry tastes great with Sambhar or Rasam Rice.


Other Dry Curries:
Bengali Chachodi
Gherkin Fry
Beet Curry
Enjoy! 
Check out the Blogging Marathon page for the other Blogging Marathoners doing BM#18
Read More...

Tuesday, July 24, 2012

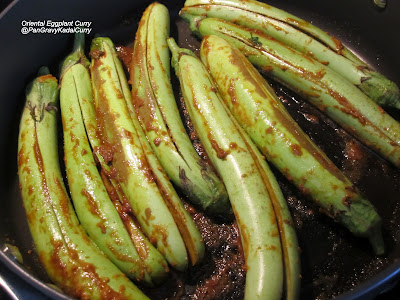
Oriental Eggplant Curry

I don't see these green eggplants in the market often. When I did, I was overjoyed and grabbed a handful to make this spectacular dry curry.
 Ingredients:
  • 8 Green Oriental Eggplants
  • Olive Oil
  • Lemon Wedges, for Garnish
  • Cilantro stalks, for garnish
For the Marinade:
  • 1-1/2 Tbsp Coriander Powder
  • 1/2 Tbsp Paprika
  • 1/2 Tbsp Chili Powder or less/more
  • Salt, as needed
  • 1/4 Tsp Turmeric Powder
  • 1 Tbsp Olive Oil
  • Juice of half lemon
Procedure:
  • Clean the eggplants.
  • Add the dry powders and salt to a small bowl. Pour Oil into the bowl.
  • Squeeze the lemon juice into the mix. 
  • Mix well. Taste a bit of this mix and check if more salt or chili powder is needed. The paste should be thick and not runny. 
  • Halve the eggplant keeping the crown intact. Afterwards, put deep slit from top to bottom without splitting them further. This pockets holds the marinade better. 
  • Smear the masala into the slits and over the eggplant. Let it sit for 30 minutes. 
  • Add a few tbsp of oil in a wide non-stick pan. Dump the leftover marinade and saute for a minute.
  • Place the marinated eggplants in a single layer without overlaping and let them cook for a minute or 2. Then turn them the other way, lid the pan and cook at low flame. Little water may be sprinkled from time to time to cook the egplants.
  • Some 30 minutes later the eggplants are  well cooked.
  •  Garnish with Lemon Wedges and Cilantro Stalks. They can be enjoyed with Rice based dishes.


Enjoy! 
Check out the Blogging Marathon page for the other Blogging Marathoners doing BM#18
Read More...

Thursday, July 19, 2012

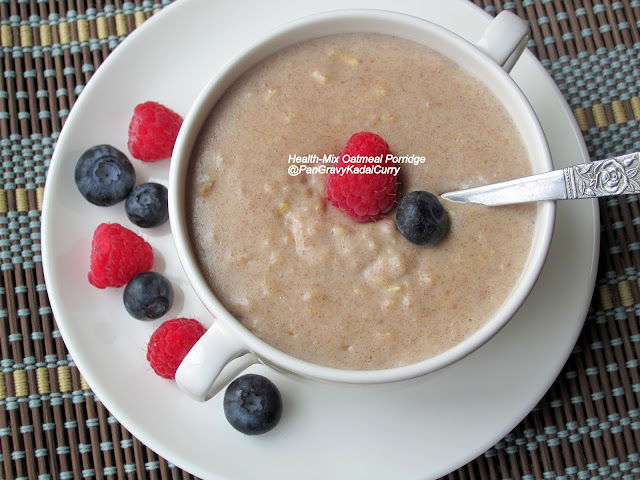
Multigrain-Lentils-Nuts "Health-Mix" Powder + Oatmeal- HealthMix Porridge

This is MIL's signature Health-Mix Powder recipe that she makes with so much love and care for her dear dear grandson. This powder is really something! You will see when you scroll down to look at the ingredient list. I have been feeding this "fortified porridge" since when my son Aran was 18 months old. I call this a "wonder powder". Sometimes I make this porridge for myself too. It is simply too good to resist!

Making this powder is truly a tedious process and is not something that I would even attempt to make it here simply because I wouldn't know where to find a "Flour Milling plant" and I am not buying the mini flour mill..Not yet atleast. In India though, every town has atleast one such plant. Every plant/factory has different Flour Mills for grinding Chili, Coriander, Grains, mixed-grains etc etc. The ingredients after going through the meticulous process of cleaning,drying,roasting gets mixed and is finally taken to the plant where it comes out as a finely milled product.

Note: Before feeding this powder to my son, I fed every ingredient separately and methodically for about a week or so to conclude that my son wasn't allergic to any ingredients that went into making the powder.Please do the same if planning on feeding this to young ones.
Ingredients:(Large Scale Prep, Yields ~4-5lbs of HealthMix Powder)
For the Health-Mix Powder:
  • 2.2 lbs/1 Kg Finger Miller/Ragi
  • 1/4 Cup Pearl Millet
  • 1/4 Cup Sambha Wheat(Wiki: Better than Ordinary wheat with low GI)
  • 1/3 Cup Each (Parboiled Rice,Red Rice,Barley,Roasted Split-Chickpea "Pottu Kadalai/Buna Channa",Dried Corn Kernels,Whole Green Gram, Sago,Dried Garbanzo Bean/ChickPea)
  • 1/2 Cup Cashew
  • 2-1/2 Cups Almonds (Not the blanched ones)
  • 3-4 Tbsp Cardamom (With Pods)
  • 2 Tbsp Dry Ginger
For the Porridge: (Yields 1 Serving for a 4-yr old)
  • 1/4 Cup Old-Fashioned Oats
  • 1-1/2 to 2 Tbsp Health-Mix Powder
  • 1 Tbsp Brown Sugar, packed
  • 2 to 2-1/2 Cups Whole Milk + 1/2 Cup more
Procedure:
  • To Make the Health-Mix Powder: Wash the Finger Millet, Pearl Millet and Sambha Wheat. Dry it completely in the Sun. Dry roast it until it emits aroma. Set aside. Roast everything else in a large kadai until they emit aroma. Don't overdo this step, especially watch out for the Corn Kernels that might start popping. Dry Roasting ensures that there is no moisture and increases the shelf life of this powder. Mix the whole thing in a container and take it to the flour mill to make it into a "finely milled powder".
  • Divide the HealthMix powder into small portions in a thick plastic bag and freeze them for upto a year. I keep a small portion of this in the refrigerator and the rest sits in the freezer.
  •  To Make the Porridge: Add all the dry ingredients for the porridge into a sauce pan.
  •  Pour the milk and mix with a whisk. Bring the mixture to a boil while constantly stirring. This step is important because they start clumping together and stick to the bottom of the pan. Once they attain a goopy consistency, switch off the stove.
  •  More (cold) milk may be added if the mixture starts thickening. Top it with fruits of choice or not.

Enjoy! 
Check out the Blogging Marathon page for the other Blogging Marathoners doing BM#18
Read More...

Wednesday, July 18, 2012

Homemade Ginger-Garlic Paste

Ginger-Garlic paste, like Masala powder is a must in Indian cooking. I cannot imagine a dish without ginger and garlic, be it vegetarian or non-vegetarian. Having the paste handy will save you time on peeling, chopping and mincing. I don't bother much making this at home as I don't mind using the readymade ones from stores.They are equally good.

Common Concern about the greenish hue the "Homemade Ginger-Garlic Paste" develops over time: I did a Google search and found this here:
1. If fresh garlic is picked before it is fully mature and hasn't been properly dried, it can turn and iridescent blue or green color when in the presence of an acid- in this case, the oils of the ginger.

2. A reaction between garlic's natural sulfur content and any copper in your water supply, or in the cooking utensils your are using (such as cast iron, tin, or aluminum) can sometimes change the color of garlic.

3. Garlic will also turn green (develop chlorophyll) if exposed to an temperature change or is exposed to sunlight. Some people say it can be stored for 32 days at or above 70 - 80° F to prevent greening.

4. Are you using table salt instead of kosher or canning salt? That can cause the garlic to turn blue or green. Table salt contains iodine, which discolors whatever you're pickling/preserving. Use kosher or pickling salt.

Don't worry, greenish-blue color changes aren't harmful and your garlic is still safe to eat. (unless you see other signs of spoilage- mold, odor).
Ginger/Garlic paste can be frozen in small portions and  thawed right before using it.

Ingredients (Yields ~14 Oz/ 1-3/4 Cups):
  • 4 head Garlic
  • Palm-sized Ginger
  • 2 Tbsp Olive Oil
  • 1 Tbsp White wine vinegar
  • 1 (Heaped)Tsp Salt, Kosher or Pickling Salt ideal
Procedure:
  • Peel the Garlic. Wash and Peel Ginger. It doesn't have to be perfectly peeled. Pat it with paper towel to remove all traces of water. It doesn't have to be perfectly peeled.
  • Roughly chop the ginger and add both the ginger and garlic to the blender. Add the oil, vinegar and salt. The Oil, Vinegar and Salt act as preservatives.
  • Blend it to a smooth paste.Make sure the blender jar is dry. 
  • Scoop it from the blender using a dry spoon and fill a dry air-tight container. Store it in the coldest part of the fridge. Never keep it at room temperature.Shelf life is upto 6-8 weeks. Freeze to extend the shelf life. Always use dry spoon to retrieve the paste.
Some Recipes using Ginger-Garlic paste:
Baked Tandoori Chicken:


Healthy Kadai Paneer:

Crispy Baked "Masala" Chicken:
Enjoy!
Check out the Blogging Marathon page for the other Blogging Marathoners doing BM#18
Read More...