
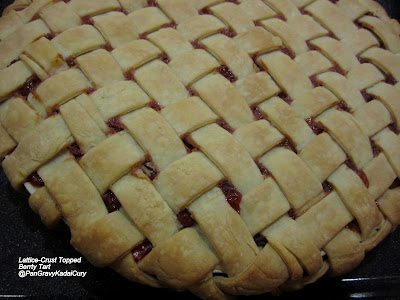
Day 5 of BM7: When me and my close buddies get together we make sure we bake something new..that is, bake something that requires a little bit of effort and something that none of us have attempted to do before. The last time we all got together under the same roof, we decided to bake this wonderful "Lattice-crust topped Berry Tart". Weaving the "interlaced top" was a bit intimidating but soon my friends took over and they finished it for me. Much later our kids and hubbies helped to polish it off. The crust practically melted into the mouth due to the amount of butter and the texture of the dough which I had taken extreme care to not overwork with.The recipe for the crust is from the book Martha Stewart's Pies and Tarts.
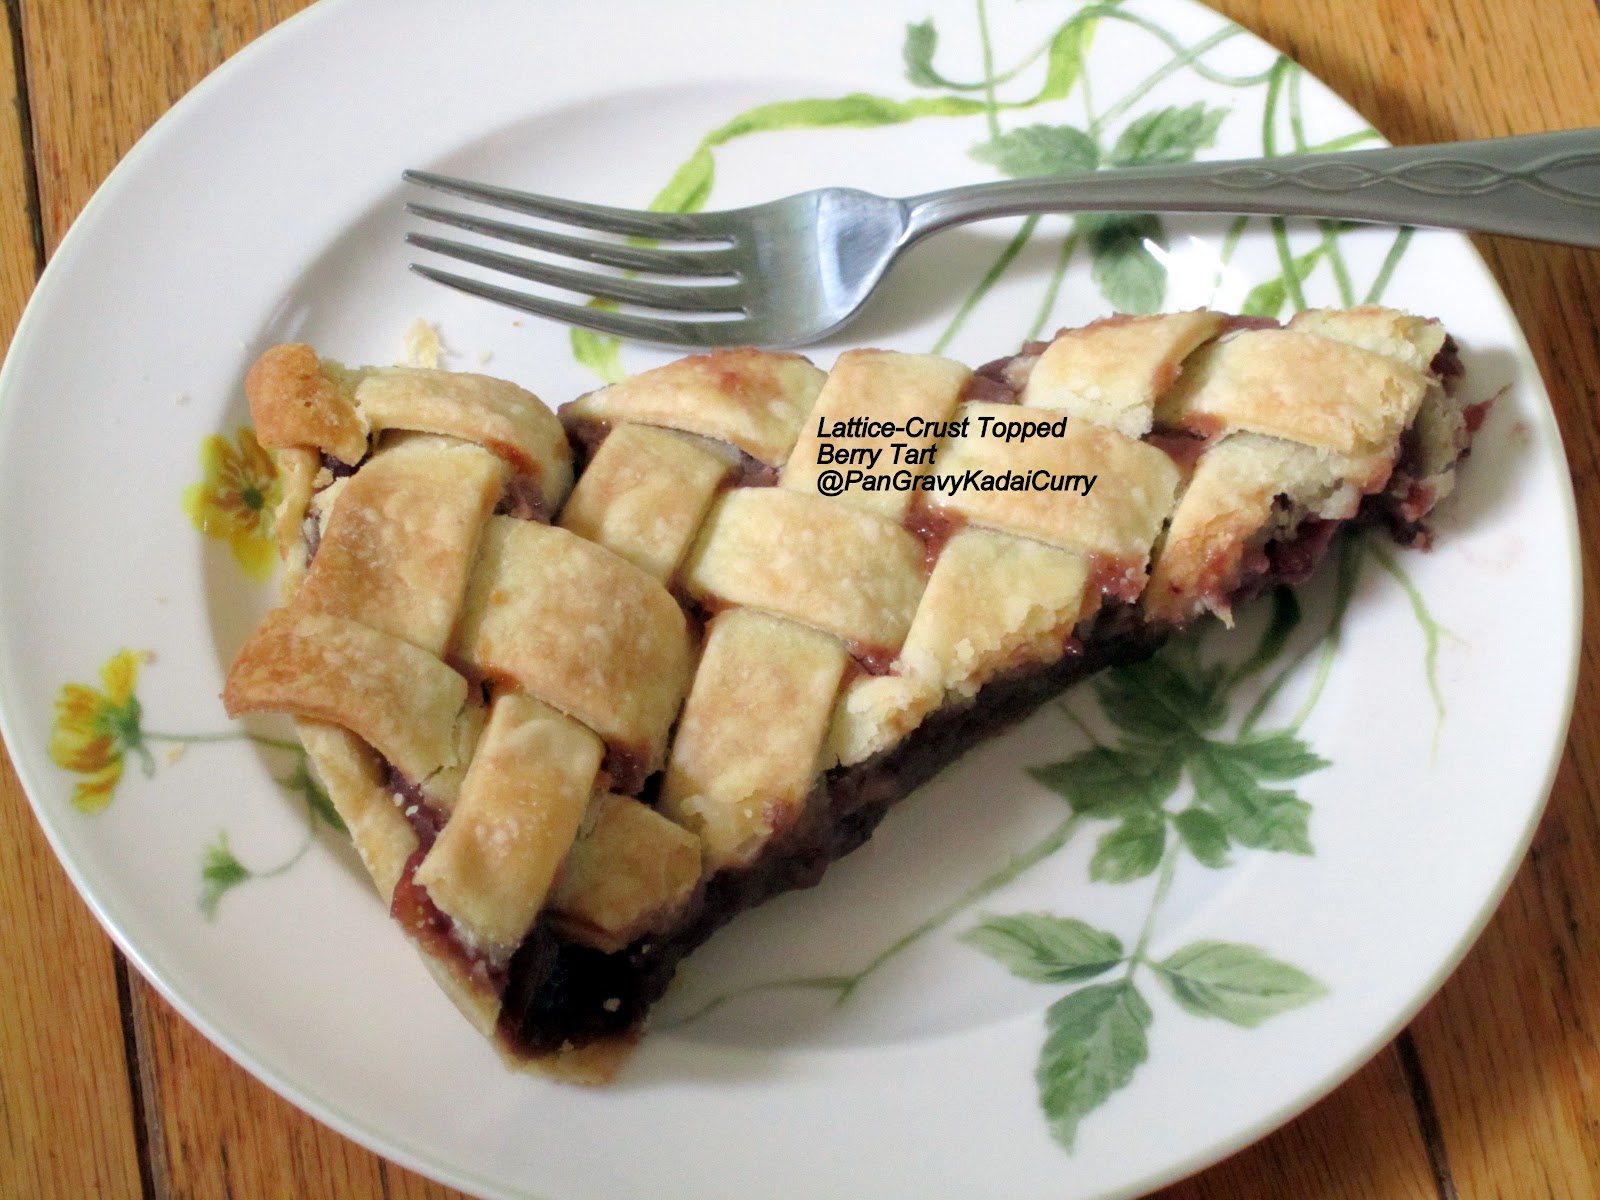
The filling could have been sweeter..I felt that I should have added more sugar because berries weren't in season at the time this tart was made. I could taste the tartness of the strawberry in every bite. But if I were to make this again, like today, I wouldn't have had any problem at all cause the berries are in peak and oh-so juicy and sweet! Thinking of juicy summer berries are making me feel weak in the knee. The endless possibilities of baking with them is making me drool.. :)
 Ingredients:
For the 10" or 11" double-crust Tart shell:


 Serves 8-10 people.
Note:
The filling could have been sweeter..I felt that I should have added more sugar because berries weren't in season at the time this tart was made. I could taste the tartness of the strawberry in every bite. But if I were to make this again, like today, I wouldn't have had any problem at all cause the berries are in peak and oh-so juicy and sweet! Thinking of juicy summer berries are making me feel weak in the knee. The endless possibilities of baking with them is making me drool.. :)
For the 10" or 11" double-crust Tart shell:
- 2-1/2 Cups Unbleached All-Purpose Flour
- 1 Tsp Salt
- 1 Tsp Granulated Sugar
- 1 Cup(2 Sticks) Cold Unsalted Butter
- 1/4 - 1/2 Cup Ice-Cold Water
- 3-4 Cups Fresh of Frozen Ripe Sweet Straw-berries, chopped (Although I used frozen, fresh is better)
- 1/3 Cup All-Purpose Flour
- 1 Cup + 1 tbsp Granulated Sugar ( can be slightly reduced depending on the sweetness of berries)
- 1 Tbsp Unsalted butter, cut into small pieces.
- Food Processor
- 10 or 11" Tart Pan
- Cut the "cold" butter into small chunks and add to a small bowl. Put it back in the fridge for 10-15 minutes.
- Add the flour, salt, sugar and the cold butter chunks to the food processor.Process for about 10 seconds or so until it resembles a coarse meal.

- Add the ice cold water little by little and pulse for 20-30 seconds just until the dough holds together. Over working will yield a tough crust.

- Divide the dough into 2 equal portions and press it into flat circle with fist.Cling wrap the dough and chill for at-least an hour.

- Make the filling: In a large mixing bowl, add the berries and sprinkle with flour,sugar and the cut butter. Gently toss to incorporate.The filling is ready.

- Roll one pastry dough into a circle large enough to fit 10" Tart pan. Line the pan with the dough and prick it in many places with a fork. Refrigerate till it is ready to be filled with the filling.

- Roll the other half of the dough to a thickness of less than 1/8 of an inch and cut it into thin strips using a pastry wheel.

- Separate the strips and lay it on a cool surface, like a marble/granite top.

- Weave the strips together as closely as possible on a parchment paper.

- When weaving make sure the perpendicular strips are properly "interlaced".To easily interlace the crust, place a horizontal strip and lift the alternate vertical strips so that the horizontal strip goes under and over "alternatively". For a 10-11" pie, the lattice crust should measure atleast 12 X 12 inches, without holes or space.

- Once the lattice top is ready, place another parchment paper on top and let it chill until its ready to use.Chilling firms up the lattice top and facilitates easy transfer to the top of the tart.

- Preheat the oven to 400 degrees F. Pour the filling into the chilled crust.

- Remove the lattice top from the fridge. Keeping it between the sheets of parchment, fold it in half. Holding it in your hand, remove the outside sheet of parchment.Place it over half the tart and carefully unfold the lattice to cover the filling. Gently remove the top sheet of the parchment. Cut off the excess pastry crust and tuck the edges.

- Bake the tart for 20 minutes at 400 degrees F. Lower the heat to 350 degrees F and bake until the crust is evenly browned and the filling set for about 25 minutes or longer.

- Cool it for 10-15 minutes prior to cutting and serving.

Note:
- The water and butter has to be "super"cold to yield a crust that just crumbles into the mouth.
- Overworking the dough will yield a tough crust..
- An egg-wash is an optional but highly desired step for a perfect brown crust.
this looks yummy
ReplyDeleteOMG such an elaborate process with so much butter..I guess it will take a lot of time for me to embark on such an adventure :)
ReplyDeletevery delicious n yumm
ReplyDeleteWow this is so cute and wonderful ....love the filling and so the pie ...great work CL
ReplyDeleteYummy.Looks delicious.
ReplyDeleteThe tart looks gorgeous and you have got the pleats perfect. Lovely pictorial. I can't wait to try this.
ReplyDeleteWow...gr8 effort dear....tart looks perfect and beautiful...
ReplyDeleteWow!!! That tart looks so good. Great job.
ReplyDeleteTart looks wonderful. Especially the lattice crust is awesome...
ReplyDeletewow... that's some taart. I am really bad at those but you are really good at it.
ReplyDeleteLooks very beautiful and yummy!!!But should have patience to make the tart.
ReplyDeleteTart looks very professionally made. Sounds delicious.
ReplyDeleteOh wow this look perfectly done..very neat job CL. Wish I can have a slice...
ReplyDeletebeautiful !!!
ReplyDeleteNice pictures...love the tart...looks scrumptious..
ReplyDeleteNever given lattice a try, thinking of how difficult it might be. But now I might. Looks delicious!!
ReplyDeleteNever given lattice a try, thinking of how difficult it might be. But now I might. Looks delicious!!
ReplyDeleteWOW! That is hardwork! Love the finish you gave to the tart. very well done!!
ReplyDeleteLooks absolutely divine, hard work has truly paid !!!
ReplyDeleteOMG ! this is sheer patience, hardwork, enthusiasm - all rolled into one yummy looking dish ! and eggless at that !! :) superb CL !!
ReplyDeleteKalyani
Indian Mithai Mela ending 8th Aug
Dish it out- Mushroom and Onions – ending 31st July
Your crust is so purrrtttyy!! Makes me happy.
ReplyDeletewell done my girl.. thats a perfectly done lattice
ReplyDeleteThat's real hardwork Lassie. Loved the step wise pics.
ReplyDeleteWorth the effort... It has come out beautifully...
ReplyDeleteLooks so pretty.
ReplyDeleteLovely tart. Nice step by step pics.
ReplyDeleteSure looks very tempting CL, good that you have friends to cook up dishes like this...:)..
ReplyDeletelooks super good; am inviting myself over !
ReplyDeleteLovely!
ReplyDeleteJust one word :Wow...the clicks had me drooling :))
ReplyDeleteLovely recipe and beautiful clicks
Happy Blogging
Rujuta
http://theworldaccordingtorujuta.blogspot.com/
Wow...gr8 effort dear....tart looks perfect and beautiful...
ReplyDeleteWhat a piece of beauty. Your step by step pix are encouraging. I am not sure how messy the world outside the pictures would be- I am little hesitant thinking about it..unless you tell me otherwise. The end result is mouth watering...wish cud take a bite with some vanilla icecream
ReplyDeletePradnya
http://pumpkinfarmfood.blogspot.com
Love the pics and recipe, but the best part was your weaving pic, amazing :)
ReplyDelete